Our sun is one of about 400 billion stars in our galaxy, the Milky Way. The majestic arc of light formed by the stars in the Milky Way is one of the most wonderous things in nature and with ever more sophisticated cameras it's becoming increasingly straightforward to capture in digital form.
I wanted to give a brief idea of how to achieve a photograph of the stars in the night-sky including, if you wish, the glowing band of the Milky Way.
Knowing a little about the layout of our galaxy helps...
To all intents and purposes, our galaxy can be considered disc shaped meaning that we see a higher concentration of stars when we look across the disc. This concentration of stars is greatest when we look toward the centre (core) of the galaxy but there's still a distinct band to be found even when facing in the opposite direction.
Photographically, the brighter core region is the more desirable area to include. It also contains the most obvious colour variations. However, due to the orbit and rotation of the earth there are only certain times of the year and certain times of night when this galactic core is visible. Fortunately, it's position in the sky is very predictable.
- Finding a Location
- Scouting
- Light Pollution
- Weather
- Software
- Finding Focus
- Camera
- Lens
- Tripod
- Head Torch
- Optional Extras
- Battery charging
- Camera settings
- Setting Focus at Night
- Gear Setup
- First Shot
- Trails vs Points
- 500 rule
- High ISO
- Long exposure
- Stacking
- Light Leaks
- Condensation
- Lightroom
- Photoshop (for stacking)
- HDRProphoto
Whilst it's useful to have the latest DSLR camera gear, an equatorial mount and zero light pollution, that's not always possible due to finances and travel limitations however I think it's still possible to achieve a beautiful astrophotography image which is well worth the planning and effort that went into it with just modest equipment and a plan!
As with many other types of photography, it's good to have an idea what you want to achieve. Wandering about aimlessly in the middle of the night is NOT the best route to success so here are some more productive things to consider.
The ideal conditions for a Milky Way photo shoot are a moonless, windless, cloudless night in an area with no light pollution. I also like to have a decent foreground subject which I feel creates a connection to us here on planet Earth but this is a personal preference.
Finding the perfect place to stand to take your photo of the night sky is not easy if you don't know the area. Go out during the day and you can see the lie of the land for some distance but as darkness falls even a small puddle can become a major frustration (especially if you're not wearing waterproof boots!) During the day it's also easier to spot decent potential foreground subjects as well as the nearby structures and objects which might ruin a decent composition. Even something as minor as a signpost can spoil an otherwise amazing image and it wont be obvious until you get back to the computer if you don't familiarise yourself with the place during daylight hours.
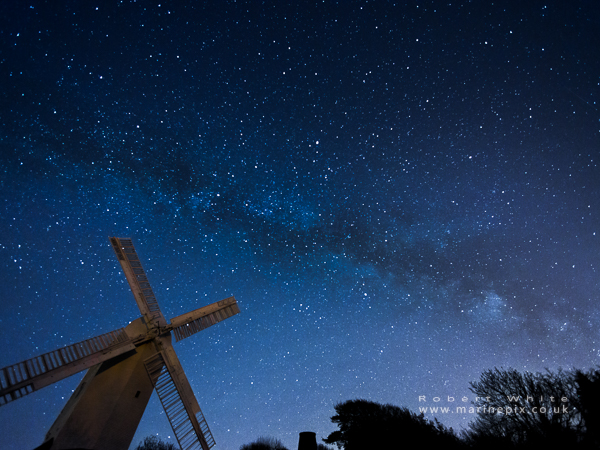
I prefer to have something in the foreground of my shots and I've tried everything from windmills to seascapes. Whatever you choose, the main thing is to ensure it doesnt obscure the sky. If the subject is big then just move back from it so you can frame it against the stars. Lone objects such as trees, statues and towers work really well but a landscape scene can look magical. If you're considering including a landscape, you might find the foreground is even darker than the night sky and as such, you'll need to light it or use an extra long exposure to bring out some of the details. It fairly easy to blend 2 images together in post-production so don't be afraid to take one image of the sky and a seperate image which shows detail in the landscape. More about post-production techniques later.
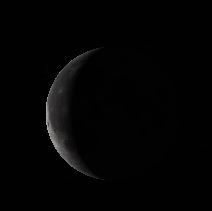 The moon, even when it's only partially illuminated, is a very bright object in the sky. The light it reflects can massively reduce your ability to distinguish stars against their background - only the brightest stars might be visible while the Milky Way remains hidden. Even if you're pointing the camera away from the moon, when there's a lot of dust or moisture in the atmosphere it diffuses the light of the moon across the whole sky creating a blanket of obscurity. I always consider waiting until another night if the moon is above the horizon with anything more than just a tiny area lit like in the image here
Although man-made light pollution tends to be limited to the horizon, it can still be greatly diffused by the atmosphere and the resulting glow will easily hide the stars. Unfortunately for UK astro-photographers, the most interesting part of the Milky Way (the "core") never comes too far above the horizon so artifical light pollution is a major consideration. We have the further disadvantage that we don't have many big open spaces which are easily accessible where we can get away from this light pollution. I've found that city lights from over 30 miles away can still affect the outcome of a photo.
 The good news is it's not impossible to get a decent photo even with a bit of light pollution around. This image of the lifeboat station in Selsey was taken facing East. The light on the left is from Bognor Regis, about 6 miles away. The image was taken at about 3am, with the moon peeking over the horizon towards the centre of the shot; The streak at the top is the trail of a meteor and there's a red glow from a light at the end of the lifeboat house so there's really rather lot of light other than that from the stars and yet the Milky Way is still obvious.
It might be obvious to suggest that a lack of cloud is ideal but wisps of cloud are still not too much of a problem since they don't usually stick around for too long. While a little wind can help move those clouds along, it may also cause your camera to wobble during the time the shutter is open. That's definitely something you want to avoid. Keeping your camera still for the duration of the shot is vital and I'd suggest spreading the tripod legs and perhaps weighting it down too. Tripods often have hooks below the centre colum and hanging a weight there can help steady things. I wouldn't suggest hanging your camera bag here as it too has the potential to move the tripod but more importantly I've found it's much easier to lose things from your bag while it's hanging up and you're rooting around in the dark trying to find something inside.
As I mentioned earlier, the position of the milkyway (and the moon and planets) is very predictable. I use a piece of software called Stellarium (www.stellarium.org) to plan my night escapades. The program is capable of simulating what the sky will look like at any date/time from any location. When I'm planning whether to head out on an astrophoto shoot, I'll check the weather and then Stellarium. It's amazing!
If you do nothing else before you head out into the night, find the position on your lens where you're focused sharply on "infinity". Disappointingly, the infinity mark on your lens is highly unlikely to be what you need to use. Instead, you should go outside in the daylight and focus on something in the far distance. Once you're happy that your subject is as sharp as it can be, mark the exact setting on the focus ring on your camera. You could, if you prefer, tape the focus ring in place but this is not ideal if you use the lens for other things. Whichever way you do it, it will save you quite a lot of hassle when you're trying to get your stars as points of light rather than fuzzy blobs.
Most modern cameras can take decent milky-way shots provided the conditions are right but there are a few things you might want to consider if you're going to buy gear specifically for astrophotography.
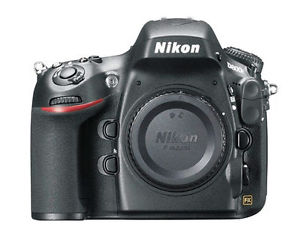 First - use a camera with an ability to work effectively in low light conditions. You want be able to make the sensor really sensitive to light without it getting confused by electronic interference and producing noise. I'd love to try out and compare lots of different cameras but I've only got a Canon 550D (cropped frame) and a Nikon D800 (Full frame). The canon works ok but I bought the Nikon with astrophotography in mind and it works really well so that's the one I use. There are loads of cameras out there capable of doing a good job. Generally, the more modern, the better it'll be at this low-light stuff
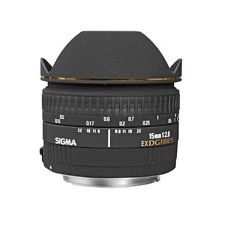 As well as the camera, you'll need a lens. If you're a compact camera user, skip this bit as you don't get much choice over your lens selection. Not all lenses are equal but in general, the wider the maximum aperture, the easier it's going to be to get stars appearing as points of light in your photos rather than star-trails. It's also worth checking beforehand at what aperture your lens is sharpest - you ideally want a lens that is sharpest at (or near) it's widest aperture.
Personally, I like to be able to capture the sky and a foreground subject all in one shot so I choose lenses which are wide angle. I have the Nikon 14mm f/2.8 lens which does a great job in the central areas of the lens. The outer edges are distinctly darker which makes it harder to get good detail across the frame whilst keeping the noise in check. I've recently been trying with my Sigma 15mm fisheye lens and although it gives a good deal of distortion, it doesnt have the same issue in the corners. I understand the 14-24mm Nikon lens is sharper and also not so dark around the edges but I'm yet to have the opportunity to try for myself. There are several other lenses that I can recommend but I haven't tried all of them so I feel it a little unfair to offer a comparison. I've had excellent results from my Nikkor 24-70mm F/2.8 lens and I've seen good results from a friend using the Nikon 16-35mm. The Rokinon 14mm f/2.8 is well regarded but I've no first hand experience of this lens.
One other option is to use a lens with a longer focal length like the 50mm f/1.8, taking a sequence of shots of the sky to create a panoramic image on the computer. The resulting images will have much more resolution than a single image and can therefore appear sharper when displayed at a similar size to a single-shot image.
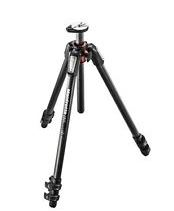 A tripod is vital for astrophotography. Although you can get away with balancing your camera on a bean-bag or even on the ground, I think you need to be able to compose your image with a bit more accuracy and consistency than these previous options offer. Having a tripod head which you can use in the dark is very handy. I've been using a Manfrotto ball head up until recently, very similar to this Manfrotto 468MGRC4
Recently, I was bought an L-Bracket adaptor made by ArcaSwiss. The L-bracket ensures the camera remains fixed in position when taking verticals where traditional tripod mounts might "droop", causing movement in your long exposure shot.
![]() Stellarium is an amazingly useful piece of free software. I use it to plan my night-time adventures. It shows me where and how full the moon will be along with moonrise and moonset times. I can't recommend Stellarium enough and it's possible to spend hours just exploring the night sky with it.
Stellarium is an amazingly useful piece of free software. I use it to plan my night-time adventures. It shows me where and how full the moon will be along with moonrise and moonset times. I can't recommend Stellarium enough and it's possible to spend hours just exploring the night sky with it.
GoSkyWatchP is an app I use on my IPAD to show me the night sky while I'm out and about. I hold it up to the sky and it tells me what can be found in the direction I'm facing. It's free on the ipad but a paid for app on the iPhone. There are a number of other apps out there which are free.
Photographers Ephemeris is another great tool which shows sunrise/moonrise times and positions. The website version is free to use but there's a small fee for the phone/tablet app.
Head Torch - Not vital but it makes things easier and safer. If it has a red light option, so much the better - using a red light will help you keep your night-vision abilities. I use a Black Diamond Spot LED HeadLamp
Lens cloth - if it's humid and chilly, you'll get condensation on your lens. You'll have to keep removing this. It can come back very quickly. If you have a way to warm up the lens, that will help prevent condensation.
Light painting torch - LED torches are ok but the light is very blue so you might want to add a warming gel to the end. It's worth getting something with an even spread of light and if possible, one which allows you to narrow the beam when you wish since there may be only small areas you want to light.
Warm, windproof clothes - it's easy to forget you'll be hanging around for a long time while doing this. Keeping warm will help you stave off the desire to get back in the car and drive home!
I'm a UK diver and I've got several items of clothing designed to keep me warm without too much bulk. If I'm heading out on a cold night, I normally wear my Arctic thermal top from Fourth Element. If it's extra cold, I'll wear the leggings too but it's worth taking an extra layer as well since these arent designed to keep the wind out.
Charge your batteries, check your card has space and that you have all the equipment you need (tripod mounting plate, remote shutter release, lens cloth to remove condensation, head torch, etc, etc.)
Check the weather again before you go out. No point going out when there's thick cloud but you might be able to find an area which is clear. I've used the BBC weather site and found it reasonably reliable.
Dress for the occassion. I'd recommend taking waterproof boots, especially if you're off to the beach... sometimes the best shots are taken at the water's edge.
Change the ISO, Shutter speed and F-stop to what you think might be reasonable values. I find that once I've got somewhere and set up my tripod, I forget to adjust any settings on my camera before taking a shot. That just wastes time. Reasonable initial settings for a wide-angle lens might be f/2.8, 20 seconds, ISO 2500
Set your equipment up as much as you can before heading out into the cold... attach your remote shutter cable (especially if you use a Nikon camera - that screw thread is a nightmare to negotiate with cold fingers!); Attach your tripod mounting plate; Attach the lens you want to use and check it's clean; Clear space on your memory card, etc, etc.
Familiarise yourself with the buttons on you're camera. Bear in mind it's going to be dark and possibly cold - you don't want to be spending ages searching for the right buttons. Although it's easy enough to turn on a light to see the buttons, the light will spoil your night-vision capabilities for a few valuable minutes.
Plan your shot... work out what you want in the foreground and where you'll need to stand to get the appropriate bit of the sky in shot. If you want the galactic core, make sure it's above the horizon at the time you're out... In the UK it doesnt stay above the horizon for long.
If you fixed your focus during the daytime, great, if not, you'll need to set focus once you get there... The stars are so faint that it's very difficult (even with live view) to zoom in and establish whether you're in focus or not. If you have to set focus at night and you're unable to see any stars, try using lights on the horizon - as far away as possible. Switch to live view, set the shutter speed to 30 seconds, the ISO to as high as it'll go and the aperture to it's widest setting; turn off auto-focus and use the live-view zoom function to enlarge the image on the display; adjust the focus so the stars form as small a point as possible.
If you can see a star when using live-view, put it in the centre of the frame before adjusting focus. Stars around the edge are subject to lens distortion and may be skewed. In either case, once you've established the appropriate setting, turn off autofocus so focusing remains where you've left it. If you don't have a mechanical switch, you might find switching to back-button focus (aka "thumb focus") is your only option.
There's definitely a case for calculating the "hyperfocal distance" for your lens/aperture, especially if you're wanting to get really detailed foregrounds but sharp stars are more important to me than anything else so I concentrate on getting pin-sharp stars.
Even after you've focused on your distant object, you may find that your stars are not quite sharp; You'll just need to adjust your focus very slightly and then try again. This is another good reason to mark your lens once you are sure you've got the right setting.
Mount the camera on the tripod and get it pointing in roughly the right direction for the milkyway. If you've just been in bright lighting conditions you might not be able to make out the milkyway immediately but your night vision should improve over the next 15 minutes or so. It will quickly disappear again each time you look at a bright light so I'd suggest dimming the LCD on the back of the camera and switching your head-torch to it's red-light setting.
If you're having trouble judging where the Milky Way is remember you can use your iPad/Tablet to determine the general direction (don't forget to turn on the app's night-vision mode!)
Doing this gives you a feeling for things that might need to change
It's important to zoom into the image on your LCD, otherwise you may not see subtle issues with focusing or star-trailing which would show up in your final photograph.
Divide 500 by the (full-frame equivalent) focal length of your lens to get the maximum number of seconds you should keep the shutter open. It doesn't mean there'll be no trails in your resulting shots, just an "acceptable amount". Different stars produce longer/shorter trails depending on their distance from the axis of rotation (usually Polaris, also known as the pole star & the North star) but the 500 rule is a good guide and you can adjust it if you find it's not good enough for your needs.
If you find that you're just not getting the milky-way coming out in your shots, it's possibly because the area you're in is suffering from a bit of light pollution. Dark skies always seem to be in the most inaccessible places and require a bit of walking to access. This is especially the case in the UK. However, you may find some darkness at the coast or in one of the national parks.
I use this site to give me an idea where I might expect to find artificial light pollution. Dark Sky Map You'll see that there are very few areas in the UK which can be described as really dark. The Scottish highlands look great for dark skies but being at a higher latitude, the MilkyWay rarely makes much of an appearance above the horizon."
The other reason your Milky Way may not be showing up properly is that your ISO sensitivity may be too low... increasing the ISO will result in more sensor noise but it should give your camera more chance of showing you the stars. Fortunately, there are a number of ways of handling noise in your photos.
If you can't lengthen your shutter speed or widen the aperture on your lens, there are 3 other options available for reducing the noise in a shot.
By combining several (noisy) shots in an application like Photoshop, you can reduce the appearance of noise quite substantially. First and foremost, you'll need to have a number of very similar shots in order to do this. The whole process is easier when you have no foreground to consider since the stars move during each shot but even with a foreground, it's fairly straightforward.
The only thing you need to remember while you're outside is to take multiple shots of the same scene without adjusting settings or moving the camera. A remote shutter release is really handy for this.
Although each shot might be "noisy", the position of the noise varies between the images. We use this to our advantage on the computer by taking an "average" reading of all the photos.
On the computer, open up all the photos as layers, mask out the foreground in each one and then align the layers. Photoshop is pretty good at doing this automatically but there are manual methods too if you need them. Once aligned, combine all the layers into a smart object and stack them using the "median" stacking method. You may choose to do the same with the foreground too. With foreground, there's no need to align the layers since it didnt move between each photo.
This whole process, admitedly, sounds a little complex but it's actually fairly easy if you follow the steps.
Rather than going into the steps in detail here, I recommend watching Ian Norman's YouTube video on the subject.

These "dew heaters" require a powersupply and cables which make them more cumbersome and another potential point of failure but they are also reusable, easy to attach/remove, arguably more reliable and perhaps more environmentally friendly too.

If you prefer a slightly more DIY approach, you can use flexible hand warmers such as these ones
I use Lightroom to both organise my photos and do most of my processing. In general, I'll carry out similar adjustments on most of my images but once I have an image I like, I'll spend a little more time fixing it up.
I like to end up with an obvious Milky Way and as I mentioned, I like to have some foreground interest too so I have to be careful not to overdo my editing, otherwise parts of the image can look unrealistic.
One of the first things I'll do, with any photo, is go to the "Lens Corrections" panel and tick the box marked "Remove Chromatic Aberration". Most lenses produce a certain amount of colour fringing (known as chromatic aberration) in areas where brights meet darks, such as stars against the sky. This tool helps to hide the blue/magenta halo which might be noticable when you examine the area closely.
Next step for me is to get my white-balance correct. To do this, I'll push the vibrance and saturation to the max. (Looks horrible to start with). I'll then adjust my temperature slider so that I get an equal amount of blue and yellow in the sky. I'll do the same with the tint slider until the green and magenta spots are roughly equal in number. After these adjustments, I'll reset the vibrance and saturation sliders. The result should be a fairly grey looking sky but with some subtle colour in the Milky Way. Of course, you can tweak the colours and, if you like increase the vibrance to taste.
Next, I'll normally reduce the exposure of my shot, increase the whites and the blacks, increase clarity and perhaps increasing shadows and highlights too.
Next is the Detail panel. If planning to do some stacking, it's worth setting the Amount, Luminance and Color slider to zero before you take your images into Photoshop. If you're not stacking, it's worth experimenting with what looks good. I tend to increase the amount of sharpness while reducing the radius value and I increase the luminosity noise reduction slightly
One thing I don't tend to do is increase contrast - I find it just hides the stars. On the other hand, doing this does darken the sky so if you're after a nice black sky with subtle stars, then perhaps increasing contrast will work for you.
In the later versions of Lightroom CC there is a "Dehaze" function available in the Effects panel of the Develop module. This is a great tool for disguising light pollution but again it should be used with a little subtlety.
Cropping and straightening are often the last things I'll do
It's very difficult to give a definitive list of adjustments because every image is different but the above should give you some idea what works for me when I'm editing the whole picture.
The next stage would be to make local adjustments, either on the foreground or the sky. One way to reduce the appearance of light pollution is to create yourself a local adjustment brush with the following settings:
Exposure +0.05
Highlights -40
Saturation -40
Color - set this to a pale bluish colour (approx Hue 230; Saturation:30%)
Brush over the areas which have an orange tint from artificial light sources. Keep the flow rate on the brush quite low so you don't create anything too obvious in your first stroke.
Also worth considering is a local adjustment brush over the MW itself - increase contrast, clarity and sharpness a little and perhaps a little saturation.
Once you're happy with your image, it's worth saving your settings as a Preset. There are plenty of online tutorials on how to create presets so check those out if youre not familiar.
Do bear in mind though that the brushes and local adjustments are not stored in your preset. To duplicate those, you'll need to copy the develop settings directly from a source image
I'll use Photoshop to stack photos that are particularly noisy.
I got the technique from Ian Norman of LonelySpeck.com . While Ian is still sharing his video on youtube, I may as well link directly to it. He has several other videos about nighttime photography so it's worth subscribing to his channel.
The main video worth watching is this one which makes use of Photoshop's auto-align abilities.
At this stage I should mention that I can and do create prints of my images so if you'd like one, please let me know. One-offs are easy to produce and I can do them on acryllic, aluminium or even standard paper!
If you'd like to hear more about my night-time photography, just drop me a line at rob@marinepix.co.uk and ask away!
If you'd like to see some of the night-time pictures I've taken, take a look at the gallery I've created here